Pages

Sunday, June 24, 2012

Steak Marinade

I love to marinate steaks. I like steaks fine without being marinated, but I love all the extra flavor you can give a steak. This marinade has a hint of sweetness from the brown sugar but the garlic, pepper, and liquid smoke give it that savory, smoky flavor. Perfect combination.


(for 2 or 3 steaks)
-1/2 c. A-1 Steak Marinade
-1 t. garlic powder
-1 t. ground black pepper
-1 T. brown sugar
-1/2 t. liquid smoke
-Lawry's Seasoning Salt
Sprinkle both sides of the steak with the Seasoning Salt. Poke with a fork a few times on each side. Mix all other ingredients together in a bowl. Pour marinade over steaks in a shallow dish. You can also put the steaks in a large ziploc bag in the marinade, if you don't have a dish that will accommodate the steaks. Let marinate for at least a day in the fridge. I've marinated them for about 3 days before and they had sooo much flavor! Then just grill as desired.

give them a good sprinkling of seasoning salt
mix marinade
pour over steaks
Who's hungry?!


Cookie Dough S'Mores

This isn't as much of a recipe as it is an idea. Thought of this one while trying to sleep the other night. We went to the lake this weekend and tried them out. Faaaaaaabulous!!!! All we did was use a square of prepared chocolate chip cookie dough instead of Hershey's chocolate for the s'more. Buy a package of the "break n bake" chocolate chip cookie dough in the refrigerated section at the store. You could make your own cookie dough if you wanted, of course. We used cinnamon graham crackers as well. I would suggest flattening down the cookie dough just a little (not to the edges of the graham cracker otherwise it will spill over once it starts melting from the marshmallow), before putting on the toasted marshmallow. Sorry there's no photos to go with this. We must have been too busy eating them to take a picture :-)

Molasses Cookies

These molasses cookies are deliciously soft and chewy, the way I make them. You can probably bake them a little longer if you like crisp, crunchy cookies. These are my father in law's favorite cookie. Maybe they're just high in the rankings- not really sure. Anyway, his birthday and Father's Day were just a couple days apart so that warranted a batch of molasses cookies for him. This recipe will make A LOT of cookies! It is super easy to divide in half though. Around Thanksgiving and Christmas (I LOVE CHRISTMAS!), I make full batches and they go like crazy, just a little FYI.
-4 1/2 c. flour
-1 T. plus 1 t. ginger
-2 t. baking soda
-1/2 t. salt
-1 1/2 t. cinnamon
-1 t. cloves
-1 1/2 c. butter (3 sticks)
-1 c. sugar, plus more for rolling
-1 c. brown sugar
-2 eggs
-2 T. water
-1/2 c. molasses
Sift all dry ingredients together. Cream butter and sugars together in a mixer. Beat in eggs. Mix in water and molasses. Scrape down the sides to make sure everything is mixed well. Add dry mixture to creamed mixture slowly. Refrigerate dough in bowl for 1 hour. I refrigerate the dough to make it easier to roll into balls. After the dough is chilled, preheat oven to 350 degrees. Roll dough into 1 inch balls. Roll in white sugar in a bowl. Bake on an ungreased cookie sheet for 8-10 minutes or until the tops start to crack. Let cool a minute before moving to a wire rack to cool.
*I've made the dough a few days ahead as a time saver, and it worked out great. I put the dough in a large ziploc bag and sealed out all the air. So just make sure that the dough is properly sealed if it's going to be sitting in the fridge longer than an hour.


Thursday, June 14, 2012

Double Chocolate Pudding Cups

If you made my ChenChelseas, then you've probably got some Won Ton Wrappers left to use up. Here ya go! Make a dessert with them! I thought of this idea while I was working out today (weird and a little backwards, I'm sure). But these really aren't too "bad" of a dessert. You just can't eat 12 of them if you're wanting to keep the ol' calories down :-) You could use waffle bowls or waffle cones if you'd rather. I really liked the taste of the won ton mixed with the sweetness of the puddings, topped with the toasted pecans, though! You could top these with sliced fruit (strawberries or raspberries, probably) also.

-1 small box Fat Free, Sugar Free Chocolate Fudge Instant Pudding
-1 small box Fat Free, Sugar Free White Chocolate Instant Pudding
-3 1/2 c. milk, divided
-1 c. Fat Free Cool Whip
-Chopped Pecans, for topping
-Won Ton Wrappers or Waffle Bowls/Cones
Make chocolate pudding according to box directions, using 2 cups of the milk. Cover and refrigerate. Mix white chocolate pudding with 1 1/2 c. milk and beat for a couple minutes until smooth. Cover and refrigerate. If using Won Ton Wrappers, place a square in each of 12 muffin cups. Push down in the middles to make a "bowl". Bake at 275 degrees for about 15 minutes or until golden and crisp. Allow to cool. Place pecans on a baking sheet. Toast in the oven for about 5-7 minutes. Remove from oven and let sit on the baking sheet until you're ready to use them. Remove both puddings from the fridge. Fold cool whip into the white chocolate pudding with a rubber spatula. You can spoon about a tablespoon of each pudding into a won ton "cup" at this point. Top with toasted pecans.

**If you want to make them swirled like mine: Tear a piece of plastic wrap off the roll about a foot long. Spoon about half of the chocolate pudding into the center of it. Fold in half and roll up the long way. Tie a knot in one side. Repeat with the white chocolate pudding. Snip the untied end off so there's about an inch or so left. Cut about 2 inches off the end of a piping bag. Place both "bags" of pudding in the piping bag evenly. Squeeze the piping bag in a circular motion into the won ton "cup" or waffle bowl, and it will come out swirled! Top with toasted pecans.

Put the pudding in the middle, fold over.
Roll up and tie knots in the end.
Place both bags in a piping bag. The smaller the tip you cut off the piping bag, the more swirled effect you can get, but it may be kind of difficult to get each color out perfectly. So, just practice a little bit (if you care haha)!
hallllllelujah!

Cheesy Chicken and Rice

The other day when I made Chicken Spaghetti, I went ahead and put a couple extra chicken breasts in the crock pot to cook. I knew I would probably want them later in the week for something. This recipe is so basic. You can get more creative with spices and stuff I'm sure. You can add a vegetable in it if you want, too. I make another variation of this recipe where I use Nature's Way Long Grain and Wild Rice instead of Instant Rice. When I do that, I actually make the rice according to the box directions, then mix it with a can of cream of chicken soup but I omit the oil. Everything else is the same except the baking time. I just keep it in the oven until the cheese is melted. Both ways are good. I actually like the Long Grain and Wild Rice way a little better, but the Instant Rice is much faster and simpler! Try 'em out and see what you think!

-1 c. instant rice
-1 can Cream of Chicken Soup
-2 T. Extra Virgin Olive Oil
-2 cooked chicken breasts, cubed or shredded
-3/4 c. shredded cheese (cheddar, casserole, fiesta, colby jack, pretty much whatever you want/have)
-salt/ pepper, to taste
Preheat oven to 350 degrees. Mix dry rice and soup together in an 11X7 or 8X8 pan. Stir in EVOO. Spread rice around pan evenly. Sprinkle salt and pepper on rice (you probably won't want much salt, just a sprinkle-ish). Put pieces of chicken on top of rice mixture. Sprinkle with cheese. Bake for 15 minutes.


Wednesday, June 13, 2012

Scrambled Cheeseburgers

Tonight's dinner WAS going to be Hamburger Helper, but then I decided I was too tired to even make that. Is that possible? Too tired to make Hamburger Helper? Yep, it is. BUT, I did have a pound of hamburger already thawed so I thought I'd better do something with it. I thought I would just patty it up and throw em on the grill. But then I'd have to go turn on the grill...patty the burgers...seasoning...blahhh...oh, and we had HOT DOG buns but no hamburger buns = hamburgers are out. Meet Scrambled Cheeseburgers. Yes, I put them in hot dog buns. Bun is a bun is a bun. It works just the same! While I was getting the hamburger browning for these, I decided I'd better just toast the buns because that's pretty delicious :-)  Austin actually said that toasting the buns was what made these cheeseburgers perfect. TOAST YOUR BUNS! :-)

-1 lb. ground beef
-4 slices American cheese
-1/2 c. ketchup
-1 teaspoon(ish) mustard
-buns
-any additional hamburger toppings you'd like
Brown hamburger. Drain grease, if any. Tear (or cut, if you want to be fancy) up the slices of cheese into a little bit smaller pieces and put in the skillet with the hamburger. Turn burner to low (2 or 3 on the dial). Stir so cheese is evenly distributed and can melt. Stir in ketchup and mustard once cheese is melted. Keep mixture on low for about 5-10 minutes to let everything heat up together. While the meat is sitting, toast the buns! Put a little spray butter or butter spread on the middles. Sprinkle with a little garlic salt. Broil on LOW until they're golden on the edges. Spoon meat mixture onto buns. Top with any other toppings you would like.
*You don't HAVE to toast the buns, so I didn't list butter and garlic salt as ingredients for this recipe. You just should toast them, because it'll taste that much better!
toasty buns!

Tuesday, June 12, 2012

Bean Dip

This is not the "7 layer bean dip" everyone and their mom makes. It's even simpler. All it is is refried beans, Rotel, and Velveeta Queso Blanco. I have developed a recent obsession with that cheese. That is all THANKS TO BRANDON for introducing us to that marvelous stuff! I made this bean dip for Bunco last night. Unfortunately, I didn't get a picture of it after I made it, so you'll just have to make it for yourself to see what it looks like. I'm sure I'll be making it again though, so someday there will be a picture of it :-)

-1 can Refried Beans
-1 can Original Rotel
-1 bag (2 cups-ish) shredded Velveeta Queso Blanco Cheese
Preheat oven to 350 degrees. Mix beans and rotel together in an oven safe bowl. **If you're like me and don't like the chunks in the rotel, blend it up before mixing it with the beans** Sprinkle cheese on top. Bake for about 10-15 minutes, or until cheese is melted. The cheese doesn't have to be melted all the way, if you're okay with stirring it into the bean dip. It doesn't look as "fancy" when you serve it, but it still tastes great! Serve with chips. Or put it in a burrito. Or a taco. Or whatever makes you happy.

Sunday, June 10, 2012

Chicken Spaghetti

Chicken Spaghetti is something that can be made very quickly. Especially if you use all my little time saving tricks! This is basically pasta, chicken, and a cheese sauce all mixed together. To save myself some time, I put 3 FROZEN chicken breasts in a crock pot with about a 1/2 c. of water and some seasonings in the morning (ish). I generously sprinkle some garlic powder, pepper, and a little Italian Seasoning all over the chicken breasts. You don't have to be too perfect because it's all going to cook together anyway. I say morningISH because it depends on what your schedule is. If it's a day I'm working, I usually put them in in the morning around 8 and by 1:00 (lunch hour), they're done. So then I can cut the chicken up and put it in a container for later that evening. I've made this on a day off (today) and I put the chicken in the crock pot around 11 and took it out at 5. So really, you need about 4-6 hours. Just do it whenever it works best for your schedule! I say to reserve 1/3 c. of chicken juice or pasta water in the recipe. I would recommend the chicken juice because it has more flavor, if you'll be cooking your chicken like this. I've also boiled the noodles ahead of time before too. Just don't forget to reserve your water if you are using pasta water! The rest of the recipe goes together very quickly! A couple other things: Sometimes I'll make this into 2 meals by using 2 8X8 square pans instead of a 9X13 pan. I bake one and freeze the other. If your family likes having leftovers though, go for the 9X13 pan. Also, you can pretty much do whatever you want as far as chicken goes. Buy a rotisserie chicken, do the crock pot idea, or bake it in the oven. I've even boiled it before and it was fine. You have to add a little more seasoning to the rest of the dish if you boil the chicken though. Lastly, the cheese. You can add more cheese if you so wish. Cheese is delicious. It ranks up there with my love for peanut butter. If you add a little more velveeta, it will be some cheesy lip smackin' deliciousness. Or sprinkle on some more cheddar cheese. Or, just don't add any more cheese and make it the way it's written ;-)

-1 13 oz. box/pkg. spaghetti noodles
-3 cooked chicken breasts
-1 can cream of chicken soup
-1/2 c. sour cream
-8 oz. velveeta cheese
-1/3 c. reserved pasta water or juice from cooking chicken breasts
-1 c. shredded cheese (use cheddar, colby jack, or casserole style)
-salt and pepper, to taste
Preheat oven to 350 degrees. Boil noodles according to package directions. While noodles are boiling, cut chicken breasts into bite sized chunks. Set aside. Cut 8 oz. of velveeta into small chunks. Place in a sauce pan, along with sour cream and cream of chicken soup. Heat over medium heat. Once the mixture starts melting, stir every couple of minutes to prevent from burning on the bottom. Once noodles are done, scoop a measuring cup into the water to obtain the "reserved pasta water", and set aside. Strain noodles. Stir cheese sauce again. Pour noodles into a 9X13 pan. Once cheese sauce is completely melted, stir in pasta/chicken water. Stir in chicken chunks. Pour mixture over the noodles. Sprinkle with salt and pepper (we go pretty generously on the pepper, but light on the salt. Then, I just allow people to salt their own dish if they want more). Top with shredded cheese. Put in the oven and bake for just about 10 minutes or until the cheese is melted and everything is heated through.


Who's hungry?!

ChenChelseas

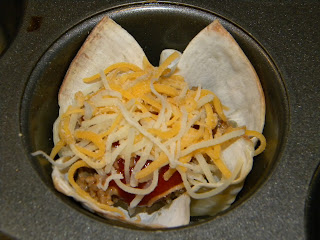
Pretty crazy name for some food, huh? Well let's all give our thanks to Brooke Martens for making that one up! :) I'll tell you how these came about first. One of my parent's friends, Celeste, makes these little things that use a won ton wrapper as a "bowl" and then she mixes some sausage, ranch seasoning, cheese, and maybe jalepenos or something (I'm not totally sure what is all in them) and fills the won ton wrappers with the mixture. She bakes them and everyone just loves them. They call them Celesties. Brooke kept forgetting what they were called and kept saying chinchillas (ha!) So I got this idea to make something similar but do a taco version. This has probably been done before- I have no idea. But, I decided I'd give this a try. So that's where the name comes from: Celesties-Chinchillas-ChenChelseas. Voila!
-1 lb. ground beef
-3 T. taco seasoning
-3 T. water
-1/3 c. sour cream
-won ton wrappers (these are found in the produce section of the grocery store, usually by the "exotic" veggies)
-taco sauce
-mexican style cheese (or whatever you like on tacos...)
-you can also add any additional taco-type toppings you like
Preheat oven to 275 degrees. Place won ton wrappers in a muffin tin. The easiest way is to just place the wrapper above the muffin cup and press down in the center and the wrapper should fold in there right. How many you need will depend on how full you fill them. It'll probably be around 18-24. Once you have a muffin tin full, bake in the oven for about 12-15 minutes or until the won tons are golden and crispy. (My first batch I didn't bake long enough, so they were a little soft on the bottoms = not good. Make sure they're crispy!) While the won tons are baking, brown your hamburger. Rinse off any grease there is. Add taco seasoning and water. Simmer for a few minutes until most of the liquid is absorbed. Stir in sour cream. Place about a tablespoon of the meat into each cooled won ton wrapper. Put about a teaspoon of taco sauce on top of the meat. Then, sprinkle a little cheese on top. Put back in the oven for about 5-8 minutes or until the cheese is melted.
**If you are using any additional toppings, put them under the cheese. Traditionally, lettuce would also go on a taco, but I didn't want to put lettuce on them and then have it be soggy and nasty. I guess if you're dying for lettuce, you could top it with lettuce right before serving.
Also, the won tons keep really well. So, you can bake the won tons ahead of time if you want. Just store them in an airtight container. If you bake too many, just keep them in the airtight container and freeze them until you're ready for them again.
This is how browned the won ton wrappers should be
Fill with some meat (I took all these pics before I realized I didn't bake this batch of won tons long enough, so that's why they're not very golden :-(   )
add some sauce and cheese

eat em up

Thursday, June 7, 2012

Chocolate Chip Cookie Cake for One

I saw a recipe for this on pinterest first. I think it was called Chocolate Chip Cookie Dough Cake maybe..? Well I tried it, and it was not quite up to par for this gal. It was pretty flavorless and DRY!! So I tweaked it a little bit to suit my taste buds and here it is! I used a fairly good sized mug. I think if you make this in a normal size coffee cup, it may puff up over the top, which is fine. BUT, if you're going to be putting a scoop of ice cream on top, you need a bigger mug! Or, the cake actually scoops out of the cup very easily, so you could just plop it out into a bowl and top 'er with a scoop of ice cream. Okay, get to cookin!

-1 egg
-1/2 t. vanilla extract
-3 T. brown sugar
-1/4 c. flour
-1 T. butter, softened
-sprinkle of cinnamon (optional!)
-3 T. milk chocolate chips, or 2 T. milk chocolate chips with 1 T. peanut butter chips (you can do whatever chips you want, really!)
Beat egg in a mug. Mix in vanilla and brown sugar. Stir in flour and butter (and cinnamon, if you're using it). Fold in chips. Microwave 2 minutes. It'll be really hot at first so I'd let it cool a little bit before eating. ORRRRR, put a scoop of ice cream on top of it.

You could certainly experiment with your spices and baking chips. You could use a tablespoon each of milk chocolate chips, dark chocolate chips, and white chocolate chips to get a little trip chocolate sort of thing going on. I also think using white chocolate chips with pumpkin pie spice would be delicious. If you do that, I'd up your pumpkin pie spice to probably  a 1/2 t. at least to get that flavor in there. If anybody tries those, let me know how they turn out!
before you microwave

I ate part of it so you all could see what the inside looks like. How nice am I?...


Wednesday, June 6, 2012

Mustard Sauce

I got this recipe from my friend's, Kasey, dad. Thanks Rick! We ate this served over grilled steak. I think it would be good to use as a sauce for hamburgers too. There's soooo many possibilities! Get wild :)

Yes, my mustard is in a container because we dropped the original bottle and it broke...didn't wanna waste it!

-1 package Beefy Onion Soup Mix
-1/3 c. milk
-1 1/2 T. mustard 
-2/3 c. sour cream
Stir soup mix and milk together in a small sauce pan. Let sit 10 minutes to dissolve completely. Stir in mustard and sour cream. Heat over low to medium heat until hot. We ate this served over steak. I'd recommend trying it on several things though! Hamburgers would be delicious too :)


Steak Fajitas

Sorry, I haven't been posting quite as often lately. We've been grilling a lot, and not getting too creative with it haha. However, we just got a 1/4 beef, so prepare for some meaty recipes coming! These were so easy. They went together pretty quickly. The only thing that takes a while is letting the meat marinate. Mine marinated for about 4 hours. I don't think it would hurt for it to sit longer, but it needs at least that time to soak up the seasonings! This is also very versatile. I used red pepper and onion for the veggies. You can do whatever you want though. Good, basic recipe here.


-2 lbs. round steak
-2 T. taco seasoning
-1 T. garlic powder
-1 t. cayenne pepper
-1/2 t. ground cumin
-4 T. lime juice
-1 t. liquid smoke
-2 c. instant rice
-1/2 red bell pepper
-1/2 of an onion
-toppings of your choice- taco sauce, salsa, cheese, sour cream, lettuce, etc.
-tortillas
Mix taco seasoning, garlic, cayenne, and cumin together in a small dish. Combine lime juice and liquid smoke in a separate dish. Evenly distribute lime juice mix onto thawed steaks. Sprinkle seasonings on each side of each steak. Cover, or keep in a large ziploc bag. Marinate in the fridge for 3-4 hours. After meat has marinated, cut it into thin strips and place in a cold skillet. Cut up veggies into pieces about the same size as the steak pieces. Place in skillet as well. You shouldn't need to add any additional liquids since the steak soaked up all that lime juice and liquid smoke. Cook over medium heat for about 15 minutes or until steak and veggies reach your desired doneness (not a word, but ya know what I mean). While the meat and veggies are cooking, make the rice. This is optional of course. Actually, you can use whatever veggies you want also. Make rice according to box directions. Once everything is done, you can combine steak, veggies, and rice to make life a little easier when serving. Spoon desired amount into a tortilla. Top with cheese, sour cream, salsa, etc. Wrap up and eat! I like to put mine in the microwave for about 20 seconds just to heat everything together.